🔐 Luồng Authentication trong React Native
📋 Tổng quan
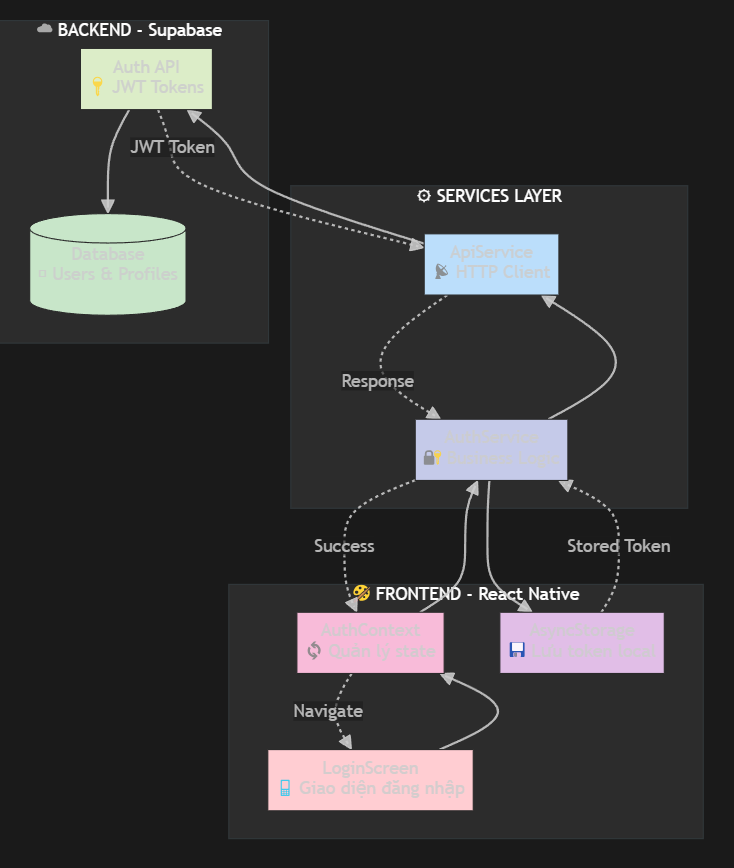
Hệ thống authentication hoàn chỉnh bao gồm 5 bước chính:
Giao diện → API Service → Authentication → Token Storage → State Management
🎯 Chi tiết từng bước

1. 🎨 Giao diện (LoginScreen)
- Nhiệm vụ: Thu thập thông tin đăng nhập từ người dùng
- Input: Email, Password
- Output: Gọi hàm login() từ AuthContext
// LoginScreen.js
const handleLogin = async () => {
  await login(email.trim(), password);
};
2. 📡 API Service
- Nhiệm vụ: Gửi request HTTP đến server
- Input: Email, Password
- Output: Response từ server (token, user info)
// ApiService.js
const API_BASE_URL = 'https://prmdkpesbdtqlysttxka.supabase.co';
const response = await post('/auth/v1/token?grant_type=password', {
  email, password
});
3. 🔐 Authentication Service
- Nhiệm vụ: Xử lý logic đăng nhập, kiểm tra quyền admin
- Input: Response từ API
- Output: Token, User info, Profile info
// AuthService.js
async login(email, password) {
  const response = await ApiService.post('/auth/v1/token', {email, password});
  const profile = await this.getProfile(response.user.id);

  if (profile.role === 'admin') {
    // Lưu token và return success
  }
}
4. 💾 Token Storage
- Nhiệm vụ: Lưu trữ token an toàn trên device
- Input: Access token, Refresh token, User info
- Output: Token được lưu vào AsyncStorage
// AsyncStorage
await AsyncStorage.setItem('authToken', response.access_token);
await AsyncStorage.setItem('refreshToken', response.refresh_token);
await AsyncStorage.setItem('userInfo', JSON.stringify(response.user));
5. 🔄 State Management
- Nhiệm vụ: Quản lý trạng thái đăng nhập trong app
- Input: User info, Authentication status
- Output: Cập nhật UI, Navigation
// AuthContext.js
const [user, setUser] = useState(null);
const [isAuthenticated, setIsAuthenticated] = useState(false);

setUser(response.user);
setIsAuthenticated(true);
🔄 Luồng hoạt động chi tiết
🎯 Sơ đồ tổng quan
Diagram dưới đây minh họa toàn bộ flow từ khi user nhập thông tin đến khi đăng nhập thành công:
Bước 1: User nhập thông tin
- User mở app → Thấy LoginScreen
- User nhập email: admin@example.com
- User nhập password: admin123
- User nhấn nút "Đăng nhập"
Bước 2: Giao diện xử lý
- LoginScreen validate input (email format, không để trống)
- Gọi handleLogin() function
- Hiển thị loading state
- Gọi login() từ AuthContext
Bước 3: AuthContext xử lý
- AuthContext nhận email, password
- Gọi AuthService.login(email, password)
- Set isLoading = true
Bước 4: AuthService thực hiện
- Gọi ApiService.post() với endpoint Supabase
- Nhận response từ server
- Kiểm tra có access_token không
- Gọi getProfile() để lấy thông tin user
- Kiểm tra role === 'admin'
Bước 5: API Service gửi request
- Tạo HTTP POST request
- Thêm headers: Content-Type, apikey
- Gửi body: {email, password}
- Nhận response từ Supabase
Bước 6: Server xử lý
- Supabase nhận request
- Kiểm tra email, password trong database
- Tạo JWT token
- Return: {access_token, refresh_token, user}
Bước 7: Lưu token
- AuthService nhận response thành công
- Lưu tokens vào AsyncStorage
- Return success cho AuthContext
Bước 8: Cập nhật State
- AuthContext nhận success response
- Set user = response.user
- Set isAuthenticated = true
- Set isLoading = false
Bước 9: UI Updates
- AuthContext trigger re-render
- App.js kiểm tra isAuthenticated
- Chuyển từ LoginScreen → DashboardScreen
- Hiển thị user info trên header
🏗️ Kiến trúc hệ thống
📐 Architecture Diagram
Sơ đồ này minh họa cách các component tương tác với nhau:
┌─────────────────┐    ┌─────────────────┐    ┌─────────────────┐
│   LoginScreen   │───▶│   AuthContext   │───▶│   AuthService   │
│  (Giao diện)    │    │ (State Manager) │    │  (Business)     │
└─────────────────┘    └─────────────────┘    └─────────────────┘
                                                       │
                                                       ▼
┌─────────────────┐    ┌─────────────────┐    ┌─────────────────┐
│  AsyncStorage   │◀───│   ApiService    │───▶│   Supabase      │
│  (Token Store)  │    │  (HTTP Client)  │    │   (Server)      │
└─────────────────┘    └─────────────────┘    └─────────────────┘
⏰ Timeline Sequence
Sequence diagram minh họa thứ tự thời gian của các bước trong quá trình authentication:
📊 Dữ liệu flow
Input Data:
{
  "email": "admin@example.com",
  "password": "admin123"
}
API Response:
{
  "access_token": "eyJhbGciOiJIUzI1NiIsInR5cCI6IkpXVCJ9...",
  "refresh_token": "eyJhbGciOiJIUzI1NiIsInR5cCI6IkpXVCJ9...",
  "user": {
    "id": "123-456-789",
    "email": "admin@example.com",
    "created_at": "2024-01-01T00:00:00Z"
  }
}
Profile Response:
{
  "id": "123-456-789",
  "email": "admin@example.com",
  "role": "admin",
  "name": "Admin User",
  "created_at": "2024-01-01T00:00:00Z"
}
AsyncStorage Data:
// Stored keys
'authToken': 'eyJhbGciOiJIUzI1NiIsInR5cCI6IkpXVCJ9...'
'refreshToken': 'eyJhbGciOiJIUzI1NiIsInR5cCI6IkpXVCJ9...'
'userInfo': '{"id":"123-456-789","email":"admin@example.com"}'
🔒 Bảo mật
1. Token Security
- Access token có thời gian hết hạn
- Refresh token để làm mới access token
- Tokens được lưu local trong AsyncStorage
2. API Security
- Mọi request đều có API key
- Authorization header với Bearer token
- HTTPS encryption
3. Role-based Access
- Kiểm tra role = 'admin' trước khi cho phép truy cập
- Chỉ admin mới được vào trang quản lý
🚀 Tối ưu hiệu suất
1. Loading States
- Hiển thị loading khi đang đăng nhập
- Disable inputs khi đang process
- Loading animation for better UX
2. Error Handling
- Catch và hiển thị lỗi network
- Validate input trước khi gửi request
- Retry logic cho failed requests
3. Token Management
- Auto refresh token khi hết hạn
- Logout tự động khi token invalid
- Interceptors để tự động add token
🎯 Kết luận
Hệ thống authentication hoàn chỉnh này đảm bảo:
- Bảo mật: Token-based auth, role checking
- Trải nghiệm: Smooth loading, error handling
- Hiệu suất: Optimized state management
- Maintainability: Clear separation of concerns
Mỗi layer có trách nhiệm riêng biệt, dễ test và maintain!
