Bài viết gần đây
| Kết Nối TradingView → FastAPI → Execution Engine Cho Bot Auto Trading
Được viết bởi thanhdt vào ngày 09/12/2025 lúc 18:49 | 143 lượt xem

Kết Nối TradingView → FastAPI → Execution Engine Cho Bot Auto Trading
Trong mô hình giao dịch định lượng hiện đại, một trong những quy trình quan trọng nhất là:
TradingView gửi tín hiệu → FastAPI nhận → Risk Engine xử lý → Execution Engine đặt lệnh
Đây là nền tảng của các hệ thống Auto Trading: Crypto, Forex và Chứng khoán.
Bài này hướng dẫn bạn:
- Tạo webhook TradingView
- Format payload chuẩn
- Gửi tín hiệu vào FastAPI
- Xử lý rủi ro
- Đặt lệnh bằng ccxt và MT5
- Tránh spam tín hiệu
- Tạo pipeline xử lý theo hàng đợi (Queue)
- Kiểm tra trạng thái bot realtime
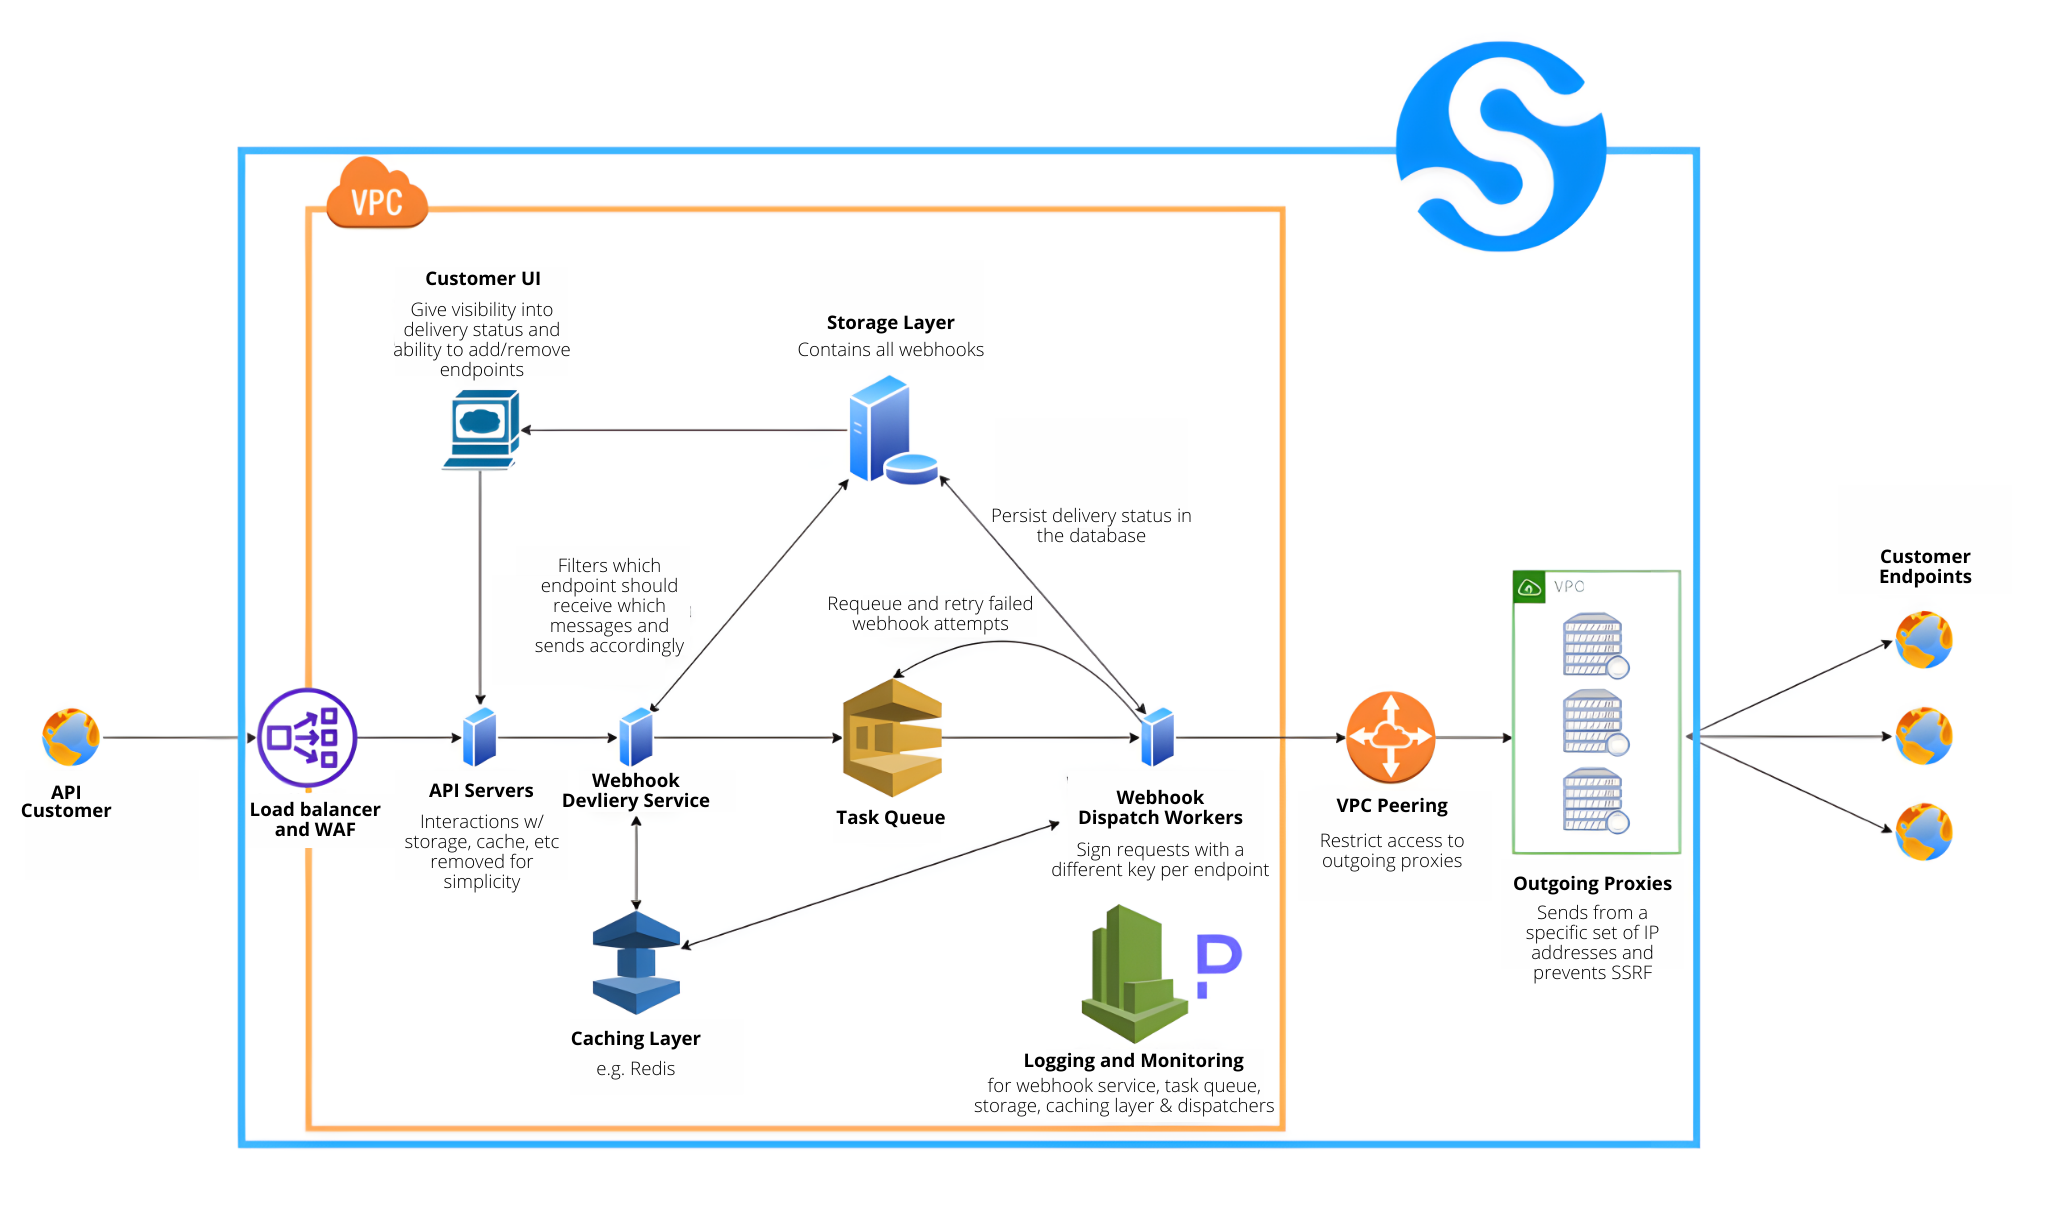
1. Kiến trúc tổng quan của hệ thống Signal → Bot
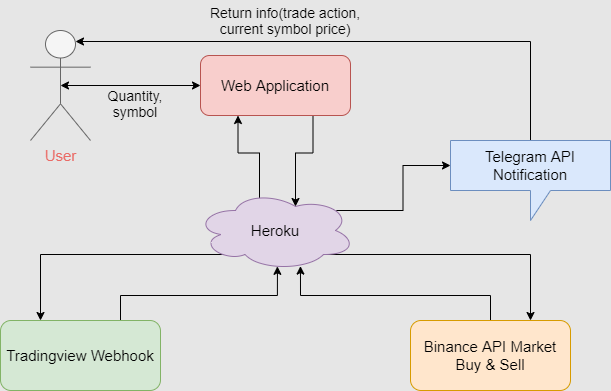

Kiến trúc chuẩn:
TradingView Strategy
       ↓
Webhook (JSON POST)
       ↓
FastAPI Webhook Endpoint
       ↓
Risk Engine (DD, TP/SL, Position Control)
       ↓
Execution Engine (ccxt / MT5)
       ↓
Exchange
       ↓
Logging → Telegram Alerts → Database
2. Tạo chiến lược Pine Script gửi tín hiệu Webhook
Mẫu Pine Script Strategy
//@version=5
strategy("HNData Bot Auto Trading", overlay=true, process_orders_on_close=true)

// Ví dụ tín hiệu đơn giản
emaFast = ta.ema(close, 20)
emaSlow = ta.ema(close, 50)

longSignal  = ta.crossover(emaFast, emaSlow)
shortSignal = ta.crossunder(emaFast, emaSlow)

if (longSignal)
    strategy.entry("Buy", strategy.long)

if (shortSignal)
    strategy.entry("Sell", strategy.short)
Payload Webhook gửi về FastAPI
Trong TradingView:
- Bấm Settings → Alerts
- Chọn “Webhook URL”
- Paste URL:
https://yourdomain.com/webhook
JSON gửi về:
{
  "symbol": "{{ticker}}",
  "price": {{close}},
  "timeframe": "{{interval}}",
  "signal": "{{strategy.order.action}}",
  "strategy_id": "ema_cross_20_50",
  "confidence": 0.95
}
3. Tạo Webhook trong FastAPI
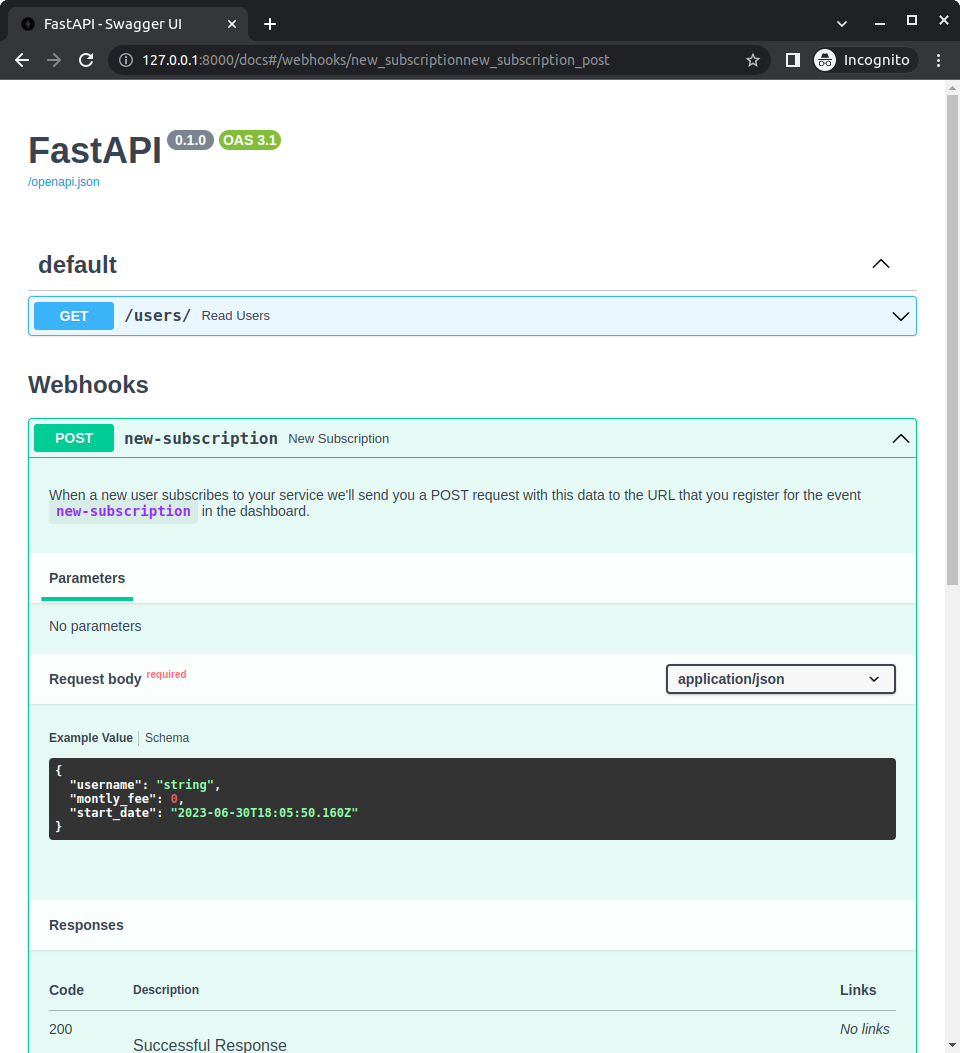

File main.py:
from fastapi import FastAPI, Request
import asyncio

app = FastAPI()
order_queue = asyncio.Queue()

@app.post("/webhook")
async def webhook(request: Request):
    data = await request.json()
    await order_queue.put(data)
    return {"status": "received", "data": data}
4. Tạo worker xử lý tín hiệu trong hàng đợi (Queue)
Queue giúp:
- Chống spam lệnh
- Chống tín hiệu gửi nhiều lần
- Đảm bảo xử lý tuần tự
- Tách Webhook và Execution Engine
async def worker():
    while True:
        signal = await order_queue.get()
        await process_signal(signal)
        order_queue.task_done()
Chạy worker trong background:
import threading

threading.Thread(target=asyncio.run, args=(worker(),), daemon=True).start()
5. Risk Engine – Chặn tín hiệu xấu trước khi đặt lệnh


Risk Engine kiểm tra:
- Đang có vị thế chưa → Không vào trùng
- Hướng vị thế trái → Không đảo chiều sai
- Drawdown > Mức cho phép → Stop bot
- Volume quá lớn → Chặn
- Stop Loss > Risk% → Chặn
Ví dụ kiểm tra vị thế Crypto:
async def risk_check(signal):
    positions = exchange.fetch_positions()
    for pos in positions:
        if pos["symbol"] == signal["symbol"] and pos["contracts"] > 0:
            if pos["side"] == signal["signal"]:
                return False
    return True
Nếu không pass:
if not await risk_check(signal):
    send_alert("⚠️ Risk block: Duplicate or invalid position")
    return
6. Execution Engine – Đặt lệnh Crypto bằng ccxt


import ccxt

exchange = ccxt.binance({
    "apiKey": API_KEY,
    "secret": API_SECRET
})

async def execute_order(signal):
    order = exchange.create_order(
        symbol=signal["symbol"],
        type="market",
        side=signal["signal"],
        amount=calc_amount(signal)
    )
    return order
7. Đặt lệnh Forex bằng MT5
import MetaTrader5 as mt5

def mt5_execute(symbol, volume, order_type):
    request = {
        "action": mt5.TRADE_ACTION_DEAL,
        "symbol": symbol,
        "type": order_type,
        "volume": volume,
    }
    return mt5.order_send(request)
8. Kết hợp FastAPI + ccxt + Risk Engine + Execution
Pipeline xử lý cuối:
async def process_signal(signal):

    # Bước 1. Kiểm tra Risk
    if not await risk_check(signal):
        return

    # Bước 2. Tính volume
    volume = calc_position(signal)

    # Bước 3. Đặt lệnh
    order = await execute_order(signal)

    # Bước 4. Lưu log
    save_order(order)

    # Bước 5. Gửi notify
    send_tele("Order executed: " + str(order))
9. Tránh spam tín hiệu (Anti-Duplicate Protection)
Sử dụng:
- Hash tín hiệu
- Cache tín hiệu gần nhất
- Timestamp kiểm tra (ví dụ 10–15s)
import time

LAST_SIGNAL_TIME = 0

def anti_spam():
    global LAST_SIGNAL_TIME
    now = time.time()
    if now - LAST_SIGNAL_TIME < 5:  # 5 giây
        return False
    LAST_SIGNAL_TIME = now
    return True
10. Trạng thái bot (Bot Status API)
FastAPI cung cấp API để:
- Kiểm tra bot ON/OFF
- Kiểm tra số dư
- Kiểm tra vị thế
- Kiểm tra health
@app.get("/status")
def status():
    return {
        "bot": BOT_STATUS,
        "balance": exchange.fetch_balance()
    }
11. Logging & Alert


- Logging lệnh (DB + file)
- Telegram Alert
- Zalo Notifications
- Dashboard UI (React / Flutter)
Ví dụ gửi Telegram:
def send_tele(msg):
    url = f"https://api.telegram.org/bot{TOKEN}/sendMessage"
    requests.post(url, json={"chat_id": CHAT_ID, "text": msg})
12. Kiểm thử Pipeline TradingView → FastAPI
Checklist:
✔ Gửi 1 tín hiệu thử từ TradingView
✔ Kiểm tra FastAPI nhận đúng JSON
✔ Risk Engine kiểm tra đúng
✔ Execution Engine đặt lệnh đúng
✔ Log lưu chính xác
✔ Bot tạo alert Telegram
✔ Không bị spam tín hiệu
✔ Không đặt lệnh trùng
13. Kết luận
Pipeline TradingView → FastAPI → Execution Engine là nền tảng của mọi hệ thống Auto Trading hiện đại.
Một bot mạnh phải thỏa:
- Nhận tín hiệu nhanh
- Không spam
- Risk Engine kiểm tra chặt
- Đặt lệnh chính xác
- Lưu log đầy đủ
- Giám sát realtime
Bot mạnh không nằm ở TradingView, mà nằm ở Backend FastAPI + Risk Engine + Execution Engine.