Bài viết gần đây
-
5. Tại sao dữ liệu là vũ khí tối thượng của nhà đầu tư hiện đại?
Tháng 3 29, 2026
| XÂY DỰNG BOT AUTO TRADING NHẬN TÍN HIỆU TỪ TRADINGVIEW
Được viết bởi thanhdt vào ngày 27/11/2025 lúc 16:36 | 320 lượt xem

XÂY DỰNG BOT AUTO TRADING NHẬN TÍN HIỆU TỪ TRADINGVIEW (WEBHOOK → PYTHON → BITGET)
Đây là một trong những mô hình mạnh nhất hiện nay:
TradingView gửi tín hiệu → Python nhận Webhook → Bot tự vào lệnh Bitget
Bot này cực mạnh vì:
- Sử dụng chính indicator TradingView → chính xác
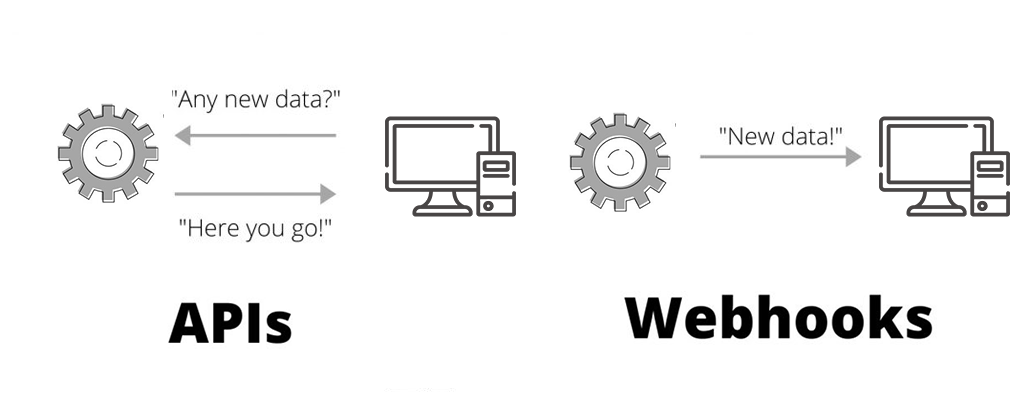
- Không cần poll dữ liệu → dùng Webhook realtime
- Vào lệnh cực nhanh (từ 0.1–0.5 giây)
- Dùng được với mọi indicator (MA, MACD, RSI, Kênh, Volume…)
- Có thể đặt Risk Management tự động
Rất phù hợp để dùng trong khóa Xu Hướng VIP, Breakout VIP, hoặc MACD Histogram.
1. Kiến trúc hệ thống Auto Trading Webhook

Hệ thống gồm 3 phần:
1) TradingView
- Indicator tạo tín hiệu BUY / SELL
- Alert → Webhook JSON
2) Python Flask Server
- Nhận Webhook từ TradingView
- Xử lý JSON
- Gửi lệnh vào Binance
3) Binance Futures
- Thực thi giao dịch
- Đặt SL/TP tự động (tùy chọn)
2. Tạo Webhook trong TradingView


Bước 1: Mở Chart → Chọn indicator
VD: MA, MACD, RSI, Kênh xu hướng…
Bước 2: Bấm Create Alert
Bước 3: Chọn:
- Condition: tín hiệu BUY hoặc SELL
- Alert Actions → Webhook URL
- Message (JSON):
Ví dụ JSON:
{
  "symbol": "BTCUSDT",
  "signal": "BUY",
  "strategy": "MA_XUHUONG"
}
3. Tạo Python Server để nhận Webhook
Cài Flask:
pip install flask python-binance python-dotenv
Tạo file server.py:
from flask import Flask, request
from binance.client import Client
from dotenv import load_dotenv
import os, json

load_dotenv()
client = Client(os.getenv("BINANCE_API_KEY"), os.getenv("BINANCE_API_SECRET"))

app = Flask(__name__)

@app.route('/webhook', methods=['POST'])
def webhook():
    data = json.loads(request.data)
    symbol = data['symbol']
    signal = data['signal']

    print("Received:", data)

    if signal == "BUY":
        client.futures_create_order(
            symbol=symbol,
            side="BUY",
            type="MARKET",
            quantity=0.01
        )

    if signal == "SELL":
        client.futures_create_order(
            symbol=symbol,
            side="SELL",
            type="MARKET",
            quantity=0.01
        )

    return {"status": "success"}
Chạy server:
python server.py
4. Expose Flask Server (Để TradingView gửi được Webhook)

Dùng ngrok:
Cài đặt:
ngrok http 5000
Ví dụ URL nhận Webhook:
https://8ac2-192-168-1-10.ngrok.io/webhook
Copy URL này → dán vào TradingView Webhook URL.
5. Tạo tín hiệu trong TradingView (Pine Script)
Ví dụ code Pine Script:
//@version=5
strategy("MA Xu Huong VIP", overlay=true)

ma6 = ta.sma(close, 6)
ma20 = ta.sma(close, 20)

longSignal = ta.crossover(ma6, ma20)
shortSignal = ta.crossunder(ma6, ma20)

if longSignal
    strategy.entry("BUY", strategy.long)
    alert('{"symbol":"BTCUSDT","signal":"BUY"}', alert.freq_once_per_bar_close)

if shortSignal
    strategy.entry("SELL", strategy.short)
    alert('{"symbol":"BTCUSDT","signal":"SELL"}', alert.freq_once_per_bar_close)
6. Thêm Stop-loss & Take-profit tự động
def place_order_with_sl(symbol, side, qty, sl_price):
    client.futures_create_order(
        symbol=symbol,
        side=side,
        type="MARKET",
        quantity=qty
    )

    client.futures_create_order(
        symbol=symbol,
        side="SELL" if side=="BUY" else "BUY",
        type="STOP_MARKET",
        stopPrice=sl_price,
        closePosition=True
    )
Bot sẽ tự:
- BUY khi TradingView gửi BUY
- SELL khi TradingView gửi SELL
- Đặt SL ngay lập tức
7. Full Bot Auto Trading Webhook → Bitget
@app.route('/webhook', methods=['POST'])
def webhook():
    data = json.loads(request.data)
    symbol = data['symbol']
    signal = data['signal']

    qty = 0.01

    if signal == "BUY":
        client.futures_create_order(symbol=symbol, side="BUY", type="MARKET", quantity=qty)

    if signal == "SELL":
        client.futures_create_order(symbol=symbol, side="SELL", type="MARKET", quantity=qty)

    return {"status": "executed"}
8. Lợi ích lớn nhất của Bot Auto Trading Webhook