Bài viết gần đây
-
5. Tại sao dữ liệu là vũ khí tối thượng của nhà đầu tư hiện đại?
Tháng 3 29, 2026
| FLUTTER API: KẾT NỐI BACKEND TỪ A–Z
Được viết bởi thanhdt vào ngày 28/11/2025 lúc 21:25 | 135 lượt xem

FLUTTER API: KẾT NỐI BACKEND TỪ A–Z
REST API – JSON – Authorization – Error Handling – Architecture


Kết nối API là kỹ năng cốt lõi giúp ứng dụng Flutter tương tác với dữ liệu thực tế như đăng nhập, hiển thị danh sách, CRUD dữ liệu, upload file, xác thực người dùng, xử lý lỗi và bảo mật. Đây là hướng dẫn đầy đủ từ cơ bản đến kiến trúc dùng cho dự án lớn.
1. KIẾN THỨC NỀN: REST API & JSON
Backend phổ biến của Flutter:
- NodeJS (Express, NestJS)
- Python (Django, FastAPI, Flask)
- Java (Spring Boot)
- PHP (Laravel)
- Go
Kiểu dữ liệu chính mà Flutter nhận từ backend là JSON.
Ví dụ response:
{
  "id": 1,
  "name": "Thanh",
  "email": "thanh@example.com"
}
Model trong Flutter cần mapping JSON → Object.
2. CÀI ĐẶT THƯ VIỆN API
Hai thư viện phổ biến nhất:
http (đơn giản, phù hợp dự án nhỏ)
dependencies:
  http: ^1.2.0
dio (mạnh, đầy đủ tính năng)
- Interceptors
- Timeout
- Logging
- Cancel request
- Upload/Download file
dependencies:
  dio: ^5.3.0
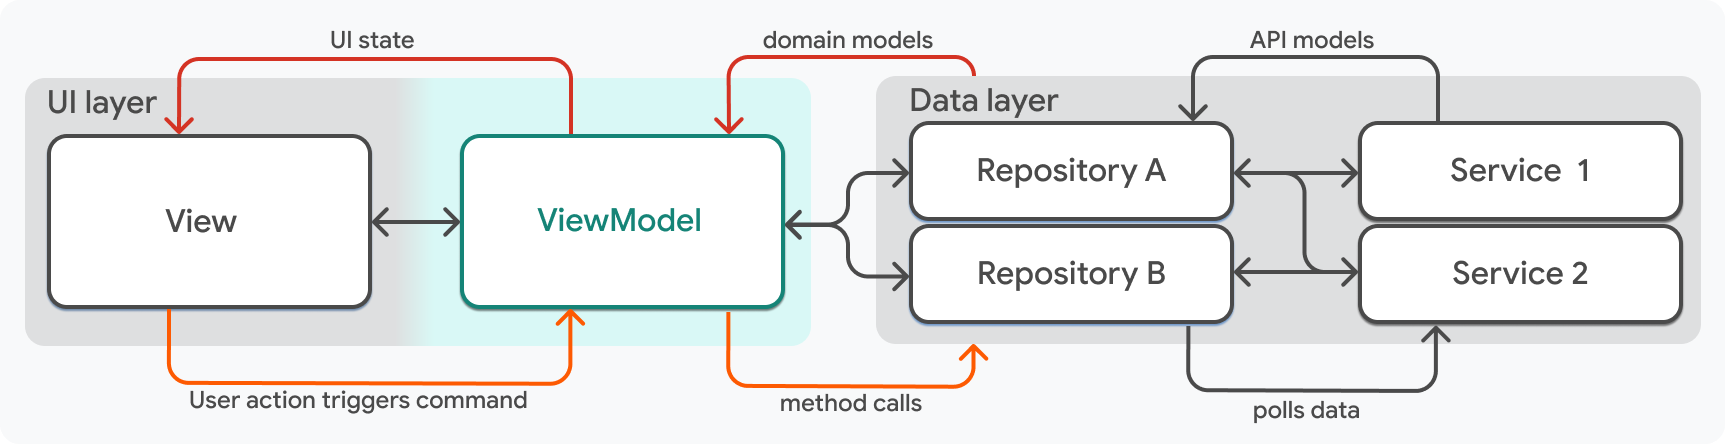
3. CẤU TRÚC DỰ ÁN KHI DÙNG API
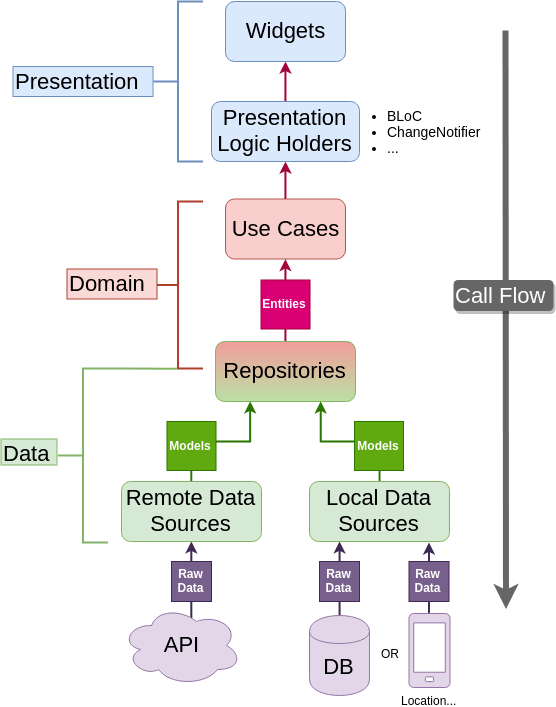
Cấu trúc chuẩn cho ứng dụng có backend:
/data
  /models
  /datasources
  /repositories
/domain
  /entities
  /usecases
/presentation
  /providers or bloc
  /views
/core
  /network
Tách tầng rõ ràng giúp dự án dễ bảo trì và test.
4. TẠO MODEL & CHUYỂN ĐỔI JSON
Model (cho Data Layer):
class UserModel {
  final int id;
  final String name;

  UserModel({required this.id, required this.name});

  factory UserModel.fromJson(Map<String, dynamic> json) {
    return UserModel(
      id: json['id'],
      name: json['name'],
    );
  }
}
5. GỌI API BẰNG HTTP (CƠ BẢN)
import 'dart:convert';
import 'package:http/http.dart' as http;

Future<UserModel> getUser(int id) async {
  final url = Uri.parse("https://api.example.com/users/$id");

  final response = await http.get(url);

  if (response.statusCode == 200) {
    return UserModel.fromJson(jsonDecode(response.body));
  } else {
    throw Exception("Failed to load user");
  }
}
6. GỌI API BẰNG DIO (CHUYÊN NGHIỆP)
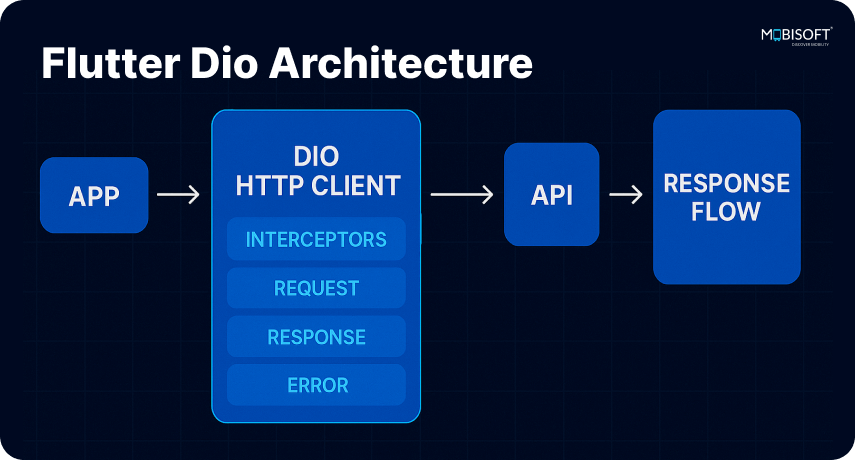

final dio = Dio(BaseOptions(
  baseUrl: "https://api.example.com",
  connectTimeout: const Duration(seconds: 10),
  receiveTimeout: const Duration(seconds: 10),
));

Future<UserModel> getUser(int id) async {
  final response = await dio.get("/users/$id");
  return UserModel.fromJson(response.data);
}
7. XỬ LÝ LỖI & TIMEOUT
Tách file error handler riêng:
try {
  final response = await dio.get("/users");
} on DioException catch (e) {
  if (e.type == DioExceptionType.connectionTimeout) {
    throw Exception("Connection timeout");
  }
  if (e.response?.statusCode == 401) {
    throw Exception("Unauthorized");
  }
  throw Exception("Network error");
}
8. AUTHENTICATION & TOKEN (JWT)
1. Login → Backend trả về JWT
2. Lưu token vào:
- SharedPreferences
- SecureStorage (ưu tiên)
3. Gửi token tự động bằng interceptor
dio.interceptors.add(
  InterceptorsWrapper(
    onRequest: (options, handler) async {
      final token = await SecureStorage.getToken();
      if (token != null) {
        options.headers['Authorization'] = "Bearer $token";
      }
      return handler.next(options);
    },
  ),
);
9. REPOSITORY LAYER
Repository giúp tách datasource API và datasource local.
abstract class UserRepository {
  Future<UserModel> getUser(int id);
}

class UserRepositoryImpl implements UserRepository {
  final UserRemoteDatasource remote;

  UserRepositoryImpl(this.remote);

  @override
  Future<UserModel> getUser(int id) {
    return remote.getUser(id);
  }
}
10. APP LAYER: RENDER DỮ LIỆU LÊN UI
Ví dụ dùng Riverpod:
final userProvider = FutureProvider<UserModel>((ref) {
  return ref.read(userRepositoryProvider).getUser(1);
});
Trong UI:
Consumer(
  builder: (context, ref, child) {
    final user = ref.watch(userProvider);

    return user.when(
      data: (data) => Text(data.name),
      loading: () => CircularProgressIndicator(),
      error: (e, _) => Text("Error"),
    );
  },
);
11. UPLOAD FILE (HÌNH ẢNH / PDF)


FormData formData = FormData.fromMap({
  'file': await MultipartFile.fromFile(path, filename: "upload.jpg"),
});

await dio.post("/upload", data: formData);
12. SOCKET & REALTIME (TÙY CHỌN)
Dùng WebSocket hoặc Socket.IO để:
- Nhận giá real-time
- Chat
- Dashboard realtime
13. TÍCH HỢP VỚI BACKEND THỰC TẾ
Backend phù hợp cho Flutter:
- FastAPI
- NodeJS
- Laravel
- Spring Boot
Workflow chuẩn:
- Backend tạo REST API
- Flutter fetch dữ liệu
- Repository xử lý
- UI hiển thị
- Lưu cache
- Xử lý lỗi
KẾT LUẬN
Kết nối API trong Flutter cần kiểm soát tốt 5 khía cạnh:
- Model – JSON – Mapping
- HTTP hoặc Dio
- Authentication & Token
- Repository Pattern
- Error handling & Timeout
Một ứng dụng Flutter dùng backend bài bản sẽ ổn định, dễ mở rộng và giảm lỗi khi scale.
THAM CHIẾU – TÀI LIỆU HỌC FLUTTER
Lộ trình và kiến thức chuyên sâu được cập nhật thường xuyên tại:
https://www.huongnghieplaptrinhflutter.com